


Last updated on
April 4, 2024
With approximately 2.4 billion active users, you can be absolutely sure that your audience hangs out on Facebook. If you want to grow your email list, Facebook is a great place to start.
But how exactly do you leverage the power of Facebook to grow your list? You could simply post on Facebook, invite your friends to join your list, and hope that people sign up. But that’s probably not the best strategy.
Your response rate will be very low. Simply put, most of your friends (or the people who like your business page) won’t click through a random post to sign up for your list.
They need a good reason to sign up for your list.
That’s where Facebook ads come into play.
Facebook Ads can be an incredibly powerful tool for lead generation and growing your email list quickly. You can get your brand in front of a highly targeted audience, and if you present them with the right offer, you can seriously grow your email list.
However, the Facebook ad platform can be tricky to get the hang of, especially if you’ve never run any Facebook Ad campaigns before.
In this post, I will be showing you exactly how to set up Facebook Ad campaigns that will grow your email list like crazy.
Let’s get started!
A few quick basics before we dive in. First, in order to use Facebook Ads, you need to have a business page on Facebook. This is different than your personal Facebook profile. You can do this in just a few minutes by following these instructions.
Once you create your page, you’re going to be using the “All tools” section of your page to create your ads.

Okay, now that we’ve gotten the basics out of the way, let’s talk about how to grow your email list rapidly with Facebook Ads.
The first step to creating a Facebook Ad campaign to grow your email list is to create a lead magnet that will entice people to hand over their email address. A lead magnet is something of value that you offer for free in exchange for someone’s contact information.
Some common forms of lead magnets:
For example, here’s an on-page SEO checklist:

When creating your lead magnet, consider how you can solve the pain points of your potential customers. Ask yourself:
Asking these questions will help you create a lead magnet that is highly relevant to your audience. The more relevant the lead magnet, the higher your conversion rate and the faster your email list will grow.
Additionally, make sure your lead magnet has a crystal-clear call to action. In the example above, the big orange button says, ‘Download Now’ on it. The call-to-action couldn’t be clearer, if you want the checklist, click this button.
Generally speaking, your lead magnet should be relatively easy to consume. In other words, it won’t take 90 minutes of their time and won’t require them to do much work. The information in your lead magnet should be easily accessible. You probably don’t want to give away a four-hour coaching video or massive eBook. Keep it short and sweet.
After you’ve created your lead magnet, it’s time to create your landing page. This is the page where you’re actually going to give away the lead magnet.
When creating your landing page, there are several things to keep in mind:
Here’s a great example of a landing page from Brian Dean. It’s simple, to the point, and doesn’t overwhelm the prospect.

Remember, your landing page only has one goal: to get people to subscribe to your email list. Don’t overcomplicate it. To learn about some of the best practices that go into designing a landing page, have a look at this guide.
One final step before we set up our campaign: we need to be able to track when people download our lead magnet and join our email list. This will allow us to see which campaigns and ads are actually driving the most cost-efficient leads for us. There are a few ways of doing this, but I’ll be showing you the method that has worked best for me.
Basically, what we will be doing is setting our lead capture form to redirect to a ‘Thank You’ page after someone submits it. This process is incredibly simple with MailMunch.
When creating your form, in the ‘Behavior’ step you will see an option to add in a redirect URL. Create a simple ‘thank you’ page on your website with a unique slug (eg. yourdomain.com/thank-you-optin) and click done.
Now, in the Facebook Ads Manager we will tell Facebook to track all traffic that comes to this URL as a successful conversion. We can do this by clicking on ‘Ads Manager’ in the top left, then ‘All Tools’, then ‘Custom Conversions’.

The rest is fairly self-explanatory. Hit the blue, ‘Create Custom Conversion’ button and a modal will pop up. In the field that says ‘Rule 1’ simply input the ending of the URL you created. So, if the thank you page you created was at ‘yourdomain.com/thank-you-optin’, all you have to enter in the box is, ‘thank-you-optin’. Name your Conversion Event something simple like ‘Opt In’ and set the Category to ‘Lead’.

After you hit the blue ‘Create’ button, we’re all set and ready to proceed with the next step: actually creating our campaign!
Now it’s time to actually create your Facebook ads.
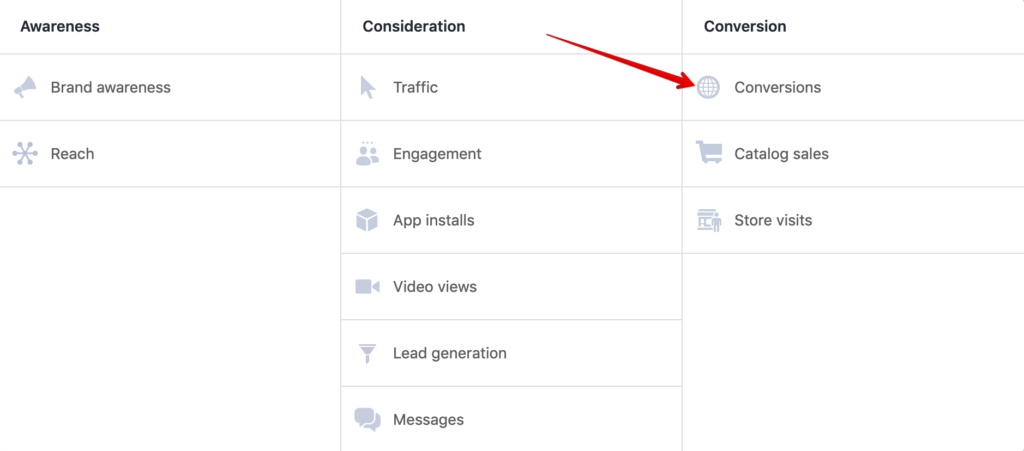
When creating the ads, Facebook gives you numerous options regarding your overall objective. The objective you select on this screen is incredibly important. This is the objective that Facebook is going to optimize your campaign around. For those looking to scale their advertising efforts quickly, considering the option to buy Facebook accounts of similar niche to run ads can provide an accelerated path to achieving broader reach and engagement.
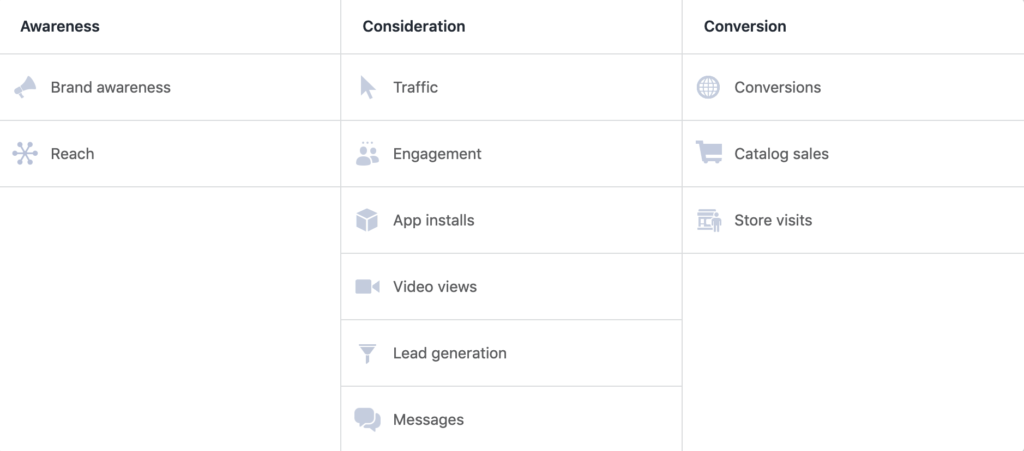
For example, if we select “Engagement” then Facebook is going to find the people most likely to like, comment, and share our post. However, we don’t just want these people. Just because someone likes your post doesn’t mean they’ll sign up for your email list.
We want people who are actually going to access our lead magnet and join our email list. For this reason, we are going to select the ‘Conversion’ objective for our lead generation campaign.
Next, you’re going to select your “Conversion Event”. You’re going to select “Lead” since that’s the goal of the campaign.

You don’t want to put your ad in front of everyone on Facebook. Rather, you only want to put it in front of an audience that is actually interested in what you have to offer.
How can you ensure it gets in front of such an audience?
Facebook provides 2 options for targeting people within a campaign:
Detailed targeting is when you enter in information about your audience, such as their interests, demographics, etc. This can be an effective way to do it, but it often ends up with you needing to make educated guesses.

However, if you are an established business, 99% of the time you are going to get the best results using lookalike audience targeting. Lookalike targeting is Facebook’s proprietary technology that allows you to create audiences of people highly similar to your existing customers or users.
In order to create a highly effective lookalike audience, you want to create a list of your most high-quality customers/users for your lookalike ‘seed’ audience. This will ensure that your resulting lookalike audience is as high-quality as possible.
The simplest way to do this is to take your existing email list, segment out the most engaged readers, and then create a custom audience from that list. Ideally, your segmented list should be between 1,000-4,000 people.

From there, you’re going to upload your segmented email list to Facebook.
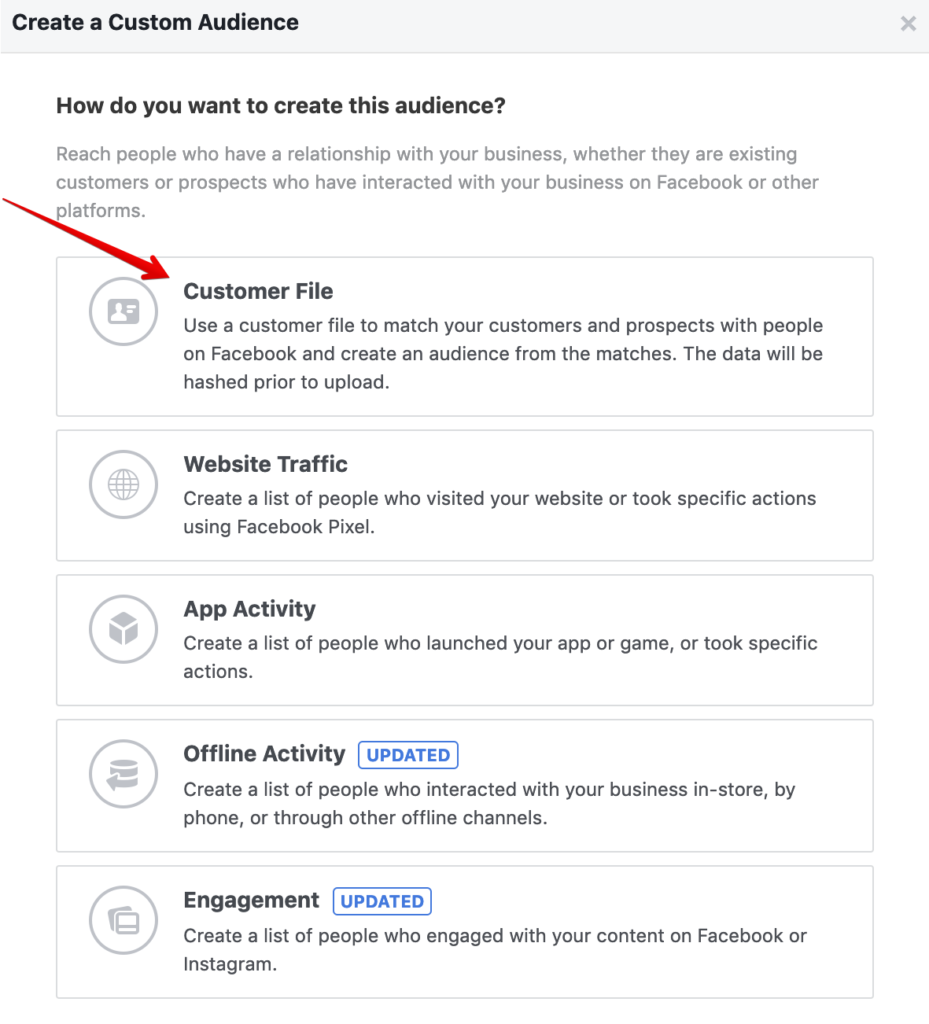
Facebook can then use your uploaded list to create a much bigger audience that shares the characteristics of your email list.

The final step to finish creating our lead generation campaign is to create the actual ads themselves.
For lead generation campaigns, I have found that short, concise copy works much better than long-form copy does. Clearly spell out what your offer is, as well as why someone should want to opt-in. It doesn’t have to be long and drawn out. Be direct and to the point.
For imagery, you can experiment. I have tested product mockups of our lead magnet, stock images, and short videos and have achieved varying results with each. Test out different creatives and find out what works best for you. There are plenty of high-quality free mockups resources on the Internet so that you can make your creative look authentic and fresh.
Here’s a great example from Digital Marketer. It’s short, to the point, compelling, and very clear. There’s no doubt about what they’re giving away and they appropriately highlight the benefits.

I recommend creating a series of ads and testing them against each other to see which one converts most effectively. Here's a list of other Facebook ad examples that you can take inspiration from.
If you want to rapidly grow your email list, it’s really hard to beat Facebook ads. Yes, you have to spend a bit of money. But studies have shown that for every $1 you spend on email marketing, you generate a whopping $38 in return. Clearly, building your email list is worth the investment.
So what are you waiting for? Get out there, create some Facebook ads, and watch your email list start to grow at a furious pace.
Content marketing guru at Mailmunch. I’m passionate about writing content that resonates with people. Live simply, give generously, stay happy.
Tags:


M. Usama
April 19, 2024

M. Usama
April 19, 2024

M. Usama
April 18, 2024


